Schrödinger’s Cat’s Möbius 3 Site
  1. Sheeran Looper X
  2. Introduction
  • Home
  • Sheeran Looper X
    • Introduction
    • Möbius Implementations
      • Background
      • Basic Version
        • MSL Scripts
        • Installation
      • Advanced Version
        • MSL Scripts
        • Installation

On this page

  • Introduction
  • Pedal Behaviour:
    • Normal Mode:
    • Mute Mode:
    • Tap Tempo:
    • Function Menu A:
    • Function Menu B:

Introduction

I don’t actually own one of these, but the User Manual is available online at https://cdn.inmusicbrands.com/sheeran/looper-x/Sheeran%20Looper%20X%20-%20User%20Guide%20-%20v1.0.0.pdf and I’ve been using that to understand how it operates.

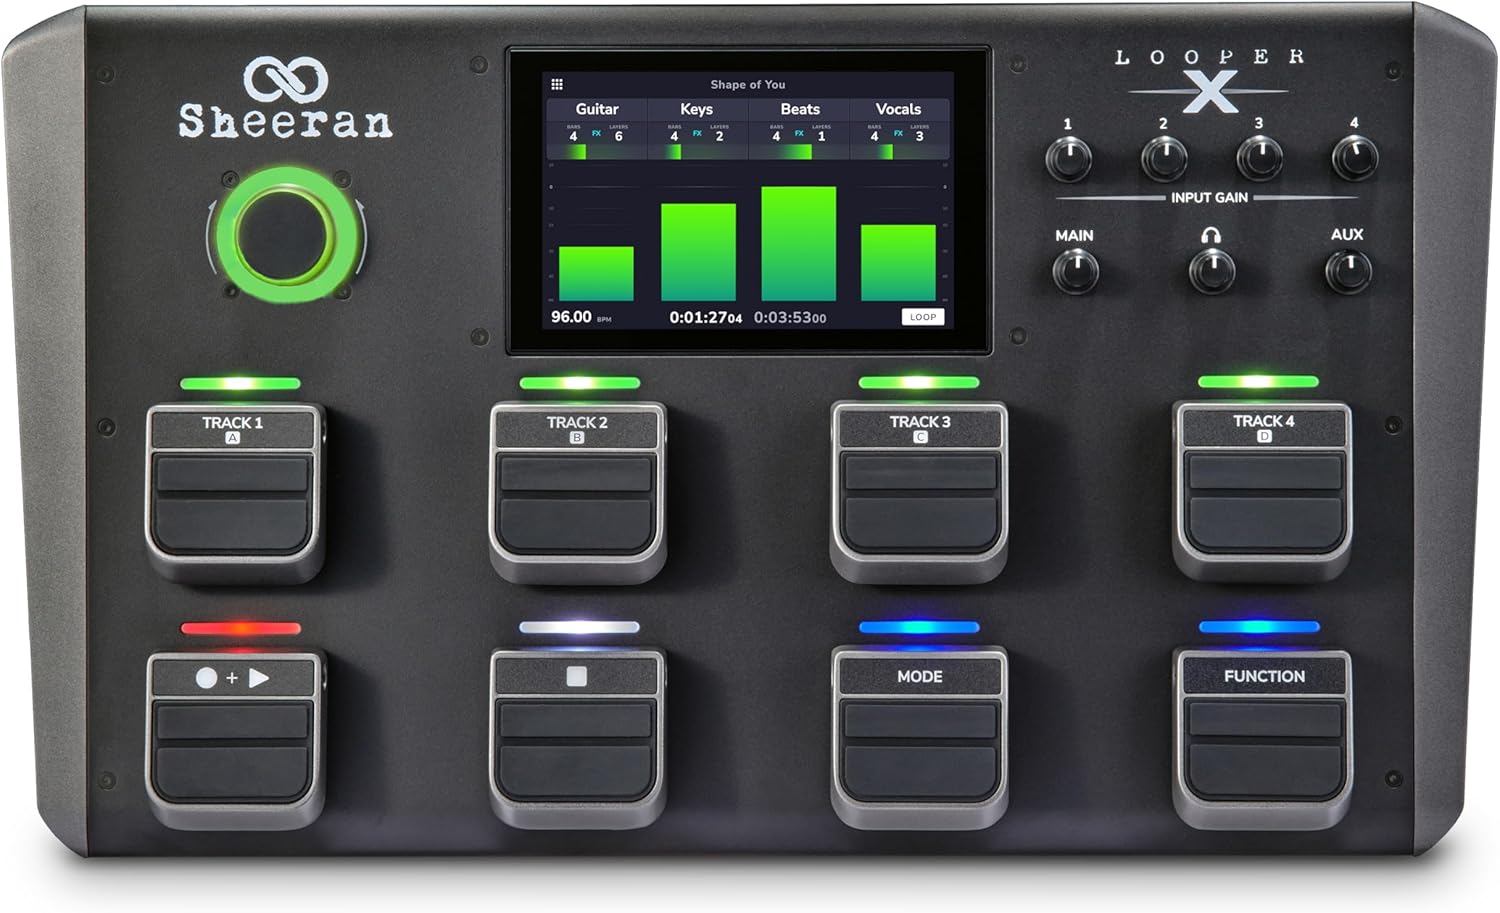
As you can see from the image above, the Looper X is basically a four track looper with eight foot pedals arranged in two rows of four.

The top row of pedals are labelled as TRACK 1/A, TRACK 2/B, TRACK 3/C and TRACK 4/D, whilst the bottom row has RECORD+PLAY, STOP, MODE and FUNCTION pedals. The pedals have multiple functions depending on the current mode of the looper. Because of this I’ll also refer to them as Pedals 1-4 (top row) and Pedals 5-8 (bottom row).

The Looper X has five different looping modes based on how the separate tracks are synchronized with each other.

  1. Multi Mode (4 synchronized tracks locked to the same length),
  2. Sync Mode (4 synchronized tracks which must be integer multiples or fractions of the primary track),
  3. Song Mode (4 tracks of potentially different lengths which can be played independently of each other),
  4. Band Mode (1 track acts as a backing loop, while the other 3 are played independently over the backing loop and must be integer multiples of fractions of the track providing the backing loop),
  5. Free mode (4 un-synced free-form tracks)

I’ve only tried to emulate the Looper X’s Sync Mode since this seems to be the most naturally aligned mode to how I use Möbius 3.

Be aware that the use of the word mode in the context of looping is distinct from the use of the word mode when referring to pedal behaviour. In subsequent sections where I refer to mode I am almost always referring to pedal behaviour.

Pedal Behaviour:

Normal Mode:

In normal operation the pedals behave as given in the table below.

Pedal 1 (TRACK 1/A) Pedal 2 (TRACK 2/B) Pedal 3 (TRACK 3/C) Pedal 4 (TRACK 4/D)
Single Press Select Track Select Track Select Track Select Track
Double Press Solo Track Solo Track Solo Track Solo Track
Press and Hold - - - -
Pedal 5 (RECORD+PLAY) Pedal 6 (STOP) Pedal 7 (MODE) Pedal 8 (FUNCTION)
Single Press Record > Dub > Play Stop all Tracks Enter Mute Mode Enter Function Menu A
Double Press - - - Enter Tap Tempo
Press and Hold Undo last overdubbed layer Clear all Tracks Change looping mode Enter Function Menu B
  • Pressing Pedal 5 starts recording a loop to the selected track if the track is currently empty. If the track is not empty, pressing Pedal 5 will toggle between playing and overdubbing the track. (Record > Dub > Play is the default order but it is possible to change the looper’s setting to make this Record > Play > Dub if preferred.)

Mute Mode:

Pedal 1 (TRACK 1/A) Pedal 2 (TRACK 2/B) Pedal 3 (TRACK 3/C) Pedal 4 (TRACK 4/D)
Single Press Mute/Unmute Track Mute/Unmute Track Mute/Unmute Track Mute/Unmute Track
Pedal 5 (RECORD+PLAY) Pedal 6 (STOP) Pedal 7 (MODE) Pedal 8 (FUNCTION)
Single Press - - Exit Mute Mode -

Tap Tempo:

Pedal 5 (RECORD+PLAY) Pedal 6 (STOP) Pedal 7 (MODE) Pedal 8 (FUNCTION)
Single Press - - - Exit Tap Tempo
Multi-Tap Set Tempo - - -
  • Tempo is set based on the time between taps on Pedal 5.

Function Menu A:

Entering Function Menu A re-maps the looper pedals to give access to the following additional functionality:

Pedal 1 (TRACK 1/A) Pedal 2 (TRACK 2/B) Pedal 3 (TRACK 3/C) Pedal 4 (TRACK 4/D)
Single Press Tuner FX Load Save
Pedal 5 (RECORD+PLAY) Pedal 6 (STOP) Pedal 7 (MODE) Pedal 8 (FUNCTION)
Single Press Peel Clear All Tracks Clear Track Exit Function Menu A
Press and Hold - - - Enter Function Menu B

FX:

This gives access to the Looper X’s internal FX processing. It’s possible to assign multiple effects (called FX Racks) at once to an audio input or looper track. Once assigned the FX rack can be toggled on or off using Pedals 1 to 4 to select the corresponding track.

Load:

This can be used to load a previously saved looping session into the Looper X. This overwrites anything that is currently in all four tracks. (It is also possible to import individual audio files to each track but this is done via Audio Import on the touch screen and cannot be done via the pedals.)

Save:

This is used to save the entire looping session.

Peel:

After pressing Pedal 5, Pedals 1–4 can be used to permanently “peel off” the last overdubbed layer of a looper track. (I assume that repeated presses of Pedals 1-4 will peel off successively more overdubbed layers from the tracks.)

Clear Track

After pressing Pedal 7, Pedals 1–4 can be used to clear the contents of individual tracks.

Function Menu B:

Entering Function Menu B re-maps the looper pedals to give access to the following additional functionality:

Pedal 1 (TRACK 1/A) Pedal 2 (TRACK 2/B) Pedal 3 (TRACK 3/C) Pedal 4 (TRACK 4/D)
Single Press Bounce Multiply Speed Backing Track
Pedal 5 (RECORD+PLAY) Pedal 6 (STOP) Pedal 7 (MODE) Pedal 8 (FUNCTION)
Single Press Transpose Fade Reverse Exit Function Menu B
Press and Hold - - - Enter Function Menu A

Bounce

After pressing Pedal 1, Pedals 1-4 can be used to which tracks you wish to bounce into a single track. Pressing Pedal 5 confirms the selection of tracks. A subsequent Press of one of Pedals 1-4 is used to determine which track the merged track is assigned to. Pressing Pedal 6 at this stage returns you to the initial track selection. A final Press of Pedal 5 performs the Bounce. Pressing Pedal 8 at any time exits without performing the bounce. (I would assume that any bounced tracks are cleared unless it used as the bounce destination.)

Multiply

After pressing Pedal 2, Pedals 1-4 are used to choose which kind of multiply is applied to the active track.

Pedal 1 (TRACK 1/A) Pedal 2 (TRACK 2/B) Pedal 3 (TRACK 3/C) Pedal 4 (TRACK 4/D)
Single Press 1/2 2x 4x 8x

Speed

After pressing Pedal 3, Pedals 1-4 are used to choose which kind of speed change is applied to the active track.

Pedal 1 (TRACK 1/A) Pedal 2 (TRACK 2/B) Pedal 3 (TRACK 3/C) Pedal 4 (TRACK 4/D)
Single Press 1/2 2x 4x 8x

Backing Track

This gives access to a basic audio player which can be used to play a single audio file as a backing track. This feature cannot be used at the same time as looping.

Transpose

After pressing Pedal 5, the pedals are re-mapped in the following way:

Pedal 1 (TRACK 1/A) Pedal 2 (TRACK 2/B) Pedal 3 (TRACK 3/C) Pedal 4 (TRACK 4/D)
Single Press Toggle Track Selection Toggle Track Selection Toggle Track Selection Toggle Track Selection
Pedal 5 (RECORD+PLAY) Pedal 6 (STOP) Pedal 7 (MODE) Pedal 8 (FUNCTION)
Single Press Adjust transposition down a semitone Adjust transposition up a semitone Enable/Disable transposition for all tracks Exit Transpose

Pressing of Pedal 5/Pedal 6 increases/decreases the transposition of all selected tracks by one semi-tone. The current cumulative transposition (in semitones) of each track is shown in the on-screen display.

Fade

After pressing Pedal 5, the pedals are re-mapped in the following way:

Pedal 1 (TRACK 1/A) Pedal 2 (TRACK 2/B) Pedal 3 (TRACK 3/C) Pedal 4 (TRACK 4/D)
Single Press Toggle Track Selection Toggle Track Selection Toggle Track Selection Toggle Track Selection
Pedal 5 (RECORD+PLAY) Pedal 6 (STOP) Pedal 7 (MODE) Pedal 8 (FUNCTION)
Single Press Fade All Increase fade rate Decrease fade rate Exit Fade

Pressing Pedals 1-4 will apply fade in or fade out to that track. Selecting a track that is playing will apply fade out to the track, while selecting a track that is stopped will apply fade in.

Pressing Pedal 5 applies fade in/out to all tracks.

Pressing Pedals 6 and 7 increase or decrease the rate of fade (though it’s not clear whether this is done in fixed steps.)

The time taken to perform the fade is shown in the on-screen display.

Reverse

Pressing Pedals 1-4 reverses the playback direction of the corresponding track.

Pressing Pedal 5 reverses the playback direction of all tracks.

Home
Background